Sony Xperia clicks high quality photos. But, if you are handing the phone over to someone else, you will want to delete all the photos and data. Even when you delete the pictures they can be recovered by someone using some data recovery tools. In this guide we will learn how to remove all the photos permanently from Sony Xperia Z5/Z3
When you connect your Sony Xperia device to the computer using the USB cable, its files and folders appear in the 'Computer' section. This is because the phone memory (internal and SD card both) acts as the external storage. This means that you can access your photos on the computer and delete them from there. Let's see how you can do it:
1) Turn your computer on and connect Sony Xperia via USB cable.
2) If you are connecting the device for the first time, you will see a balloon notification popping from the Taskbar stating that Windows is installing the driver.
3) Wait for the driver installation to complete. You might see a couple of 'Auto-Play' pop-up windows as well. Ignore and close them.
4) Now, open the 'Computer' (or 'My Computer' if you are using an older version of Windows) folder from the Start Menu. Along with the other drives and connected storage devices, you will also see the two icons as shown in the picture below:
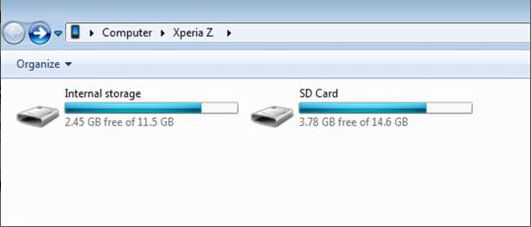
5) Depending upon where your photos are saved, double click one of the two icons. Navigate to the 'Pictures' or DCIM folder.
6) You will be able to see the list of all the photos saved in this folder. Press CTRL + A to select all the photos at once.
7) Now, press SHIFT + Del buttons to delete the photos permanently. In case you have saved the photos in any folder other than DCIM folder, navigate to that particular folder in Step 6 instead of DCIM and repeat the steps from 1 to 7.
This will delete the photos from your Sony Xperia device. but in fact the photos is not really wiped, the photos is only marked as empty sector in the storage system and waiting for new data to be covered. So, this means the 'deleted data' still remain on the system, still be recovered using a recovery tool.
You can delete the photos and albums using your phone itself. Just like the first method, photos will be removed from your device. You will not be able to recover them normally. But, they will still be recoverable using the recovery tool. Here are the steps to follow:
1) Open Gallery on your Sony Xperia device. You should be able to see the screen like below.
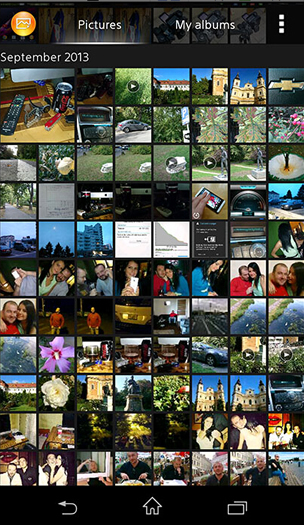
2) Since you wish to delete all the photos at once, there is no need to waste time selecting and deleting photos individually. It would be better to delete the entire album. Therefore, select 'My Albums' tab on the top.
3) You will now see the list of the albums. Press and hold the album from which you wish to delete the photos. The album will get selected.
4) Now press 'Delete' button, confirm your action when you see the pop-up dialogue.
As aforementioned, the photos can still be recovered. In order to make sure nothing can be recovered, use Android Data Wiper in the Method 3.
Data recovery tools are able to retrieve the deleted photos from Sony Xperia (or for that matter any phone), this is because when you delete the photo, it does not appear on the location but its information stays. When you save something else on the same location, only then the file information is lost.
SafeWiper for Android is professional Android Data Wiper which it can be able to make sure no traces of your photos are left behind, with the military arithmetic ( DoD 5220.22-M), the program can directly write redom data to the storage system to completely overwritte the data, make the deleted photos unrecoverable! In addition to erase photos, it also support erasing text messages, contacts, call history, videos, audios and more.
Download it here and try to remove photos from Sony device.
You need to download, install the program on a computer, then connect your Sony phone to computer via USB cable. Run the program, once your handset is recognized by the program, the interface will pop up as below. The program will install an app on your device for communicating between phone and PC.
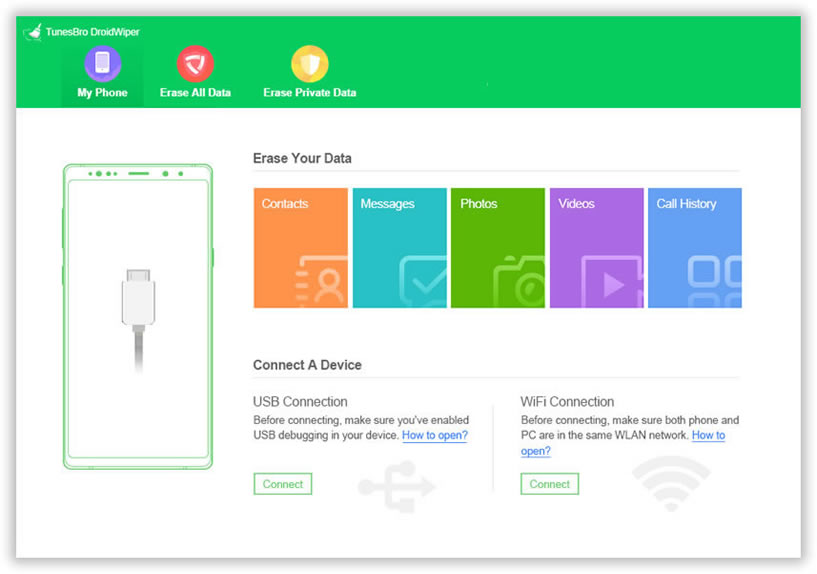
Once your handset is recognized by the program, the interface will pop up as below, then just select the option of Eraser Private Data from the main screen. This wiping mode means it will erase everything from your Sony device.
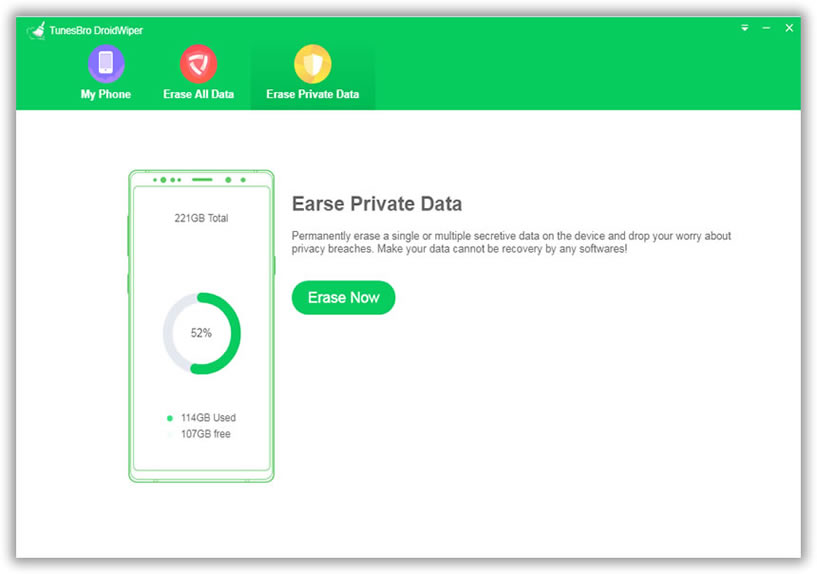
Press the "Start Scan" button in the middle and wait for sometime, all the data will be found and display on the left. Just click the photos to preview and select which one you want to erase.
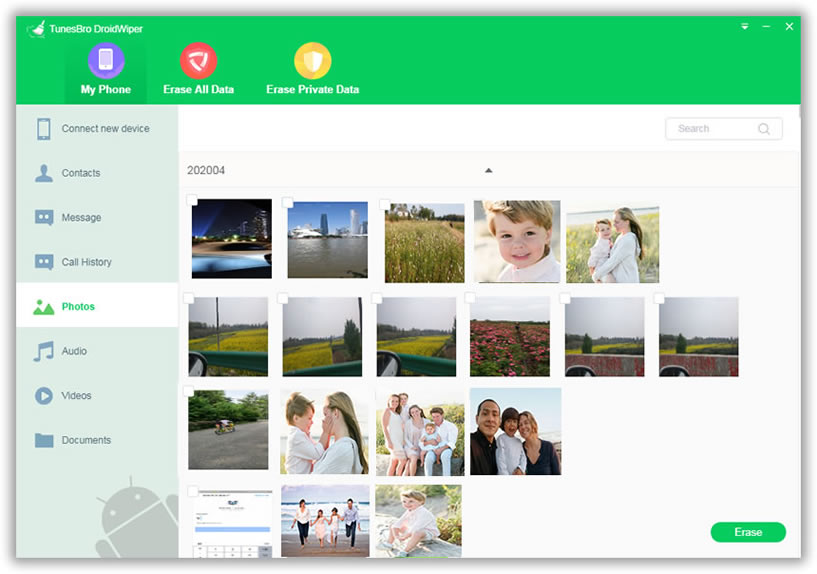
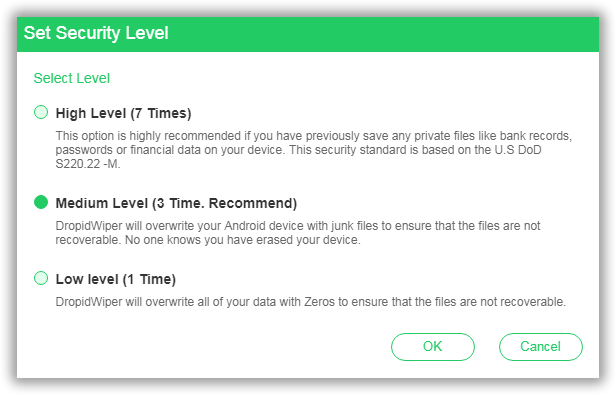
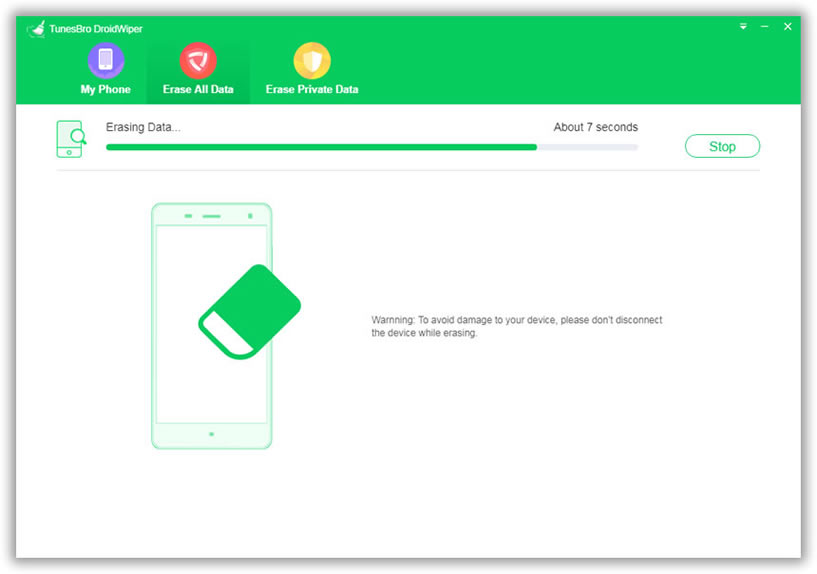
Click the Erase button to get started, you can select the security level by clicking settings button. Then type Erase word in the box to confirm. Before erasing your photos, please make sure you've backed up your important photos. This process can take a minute or so to complete, so be patient. And keep the phone connected always.
You will see a box in the next step and ask you to type "delete" into the box to confirm. You can also click "Security Level" button to change the security level, there are three wiping option for your choice.
After you confirm, click Erase button to start erasing your photos. It will take a few minutes to finish the erasing task, you must keep the connection while erasing. After the erasing, your phone will restart normally, then your data was gone.
If you wish to delete the photos permanently then the best option is to use the Android Data Wiper too. It makes sure that the photos are deleted permanently and they cannot be recovered using any recovery tool.
SafeWiper for Android is capable of erasing everything from Sony phone or other Android brands phone. After wiping by Safewiper, , it will be almost impossible to unscramble your data with any software even the military level. Then you can no longer worry that your little secret may be exposed to someone. Then you can no longer worry that your little secret may be exposed to someone.


![]()
![]()
![]()