Basically, USB Debugging Mode is an advanced developer mode in Android smartphones that allows the software and app developers to connect Android and computer to copy the APK apps via USB data cable for testing and experimenting process. There are other uses of USB Debugging mode as well such as rooting Android smartphones, recovering lost data and erase data, install third party apps, establishing a connection between Android and Android SDK tool also known as Software Development Kit.
If you wish to upgrade your Android system to Android 7.0 nougats or Android 8.0 Oreo then also you will first have to enable USB debugging mode on your Android so that the necessary tools can be connected with your Android from PC. Other applications also include installing custom ROMs, backing up Android, enabling SD card partition and so on.
So, let’s checkout how to enable USB Debugging Mode on different Android brands.
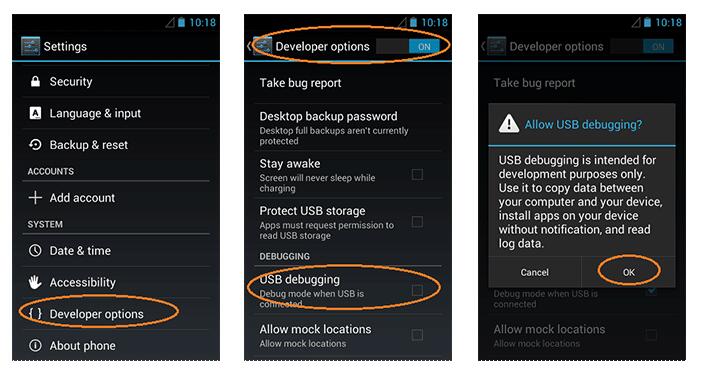
In later Android versions like 3.0 to 4.1.X which is also known as Android Honeycomb and Ice Cream Sandwich, follow these steps to enable USB Debugging Mode.
Step 1. Tap "Menu" then "Settings".
Step 2. Scroll down and tap on "Developer Options" under System section.
Step 3. Toggle on the "USB Debugging" option.
Step 4. Scroll down and check the "USB Debugging" box. A pop up message will appear, simply click on "OK" to enable the option.
The latest Android smartphones follows the same pattern to enable USB Debugging mode. You can use the following steps to enable USB Debugging mode on Android version 4.2.X to the latest 8.0. In short, it works with Android Jelly Bean, KitKat, Lollipop, Marshmallow, Nougat and the recent Android 8.0 Oreo.
Step 1. Tap on "Menu".
Step 2. Slide through the options and select "Settings".
Step 3. Scroll down to the most bottom and tap on "About Phone" located under the system menu.
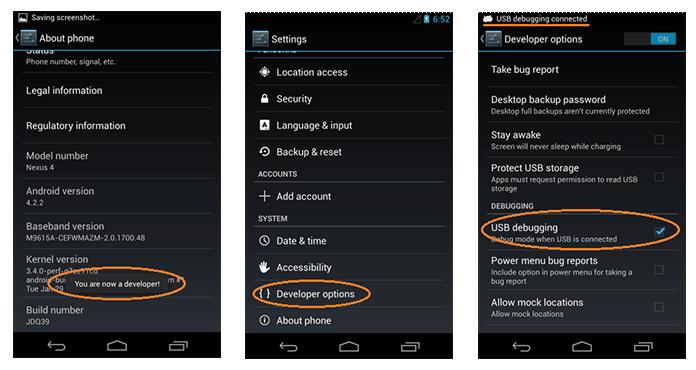
Step 4. Find the "Builder Number" and tap on it like 5-10 times depending on which brand you are using. Keep on tapping unless you can see a message that says "You are now a developer".
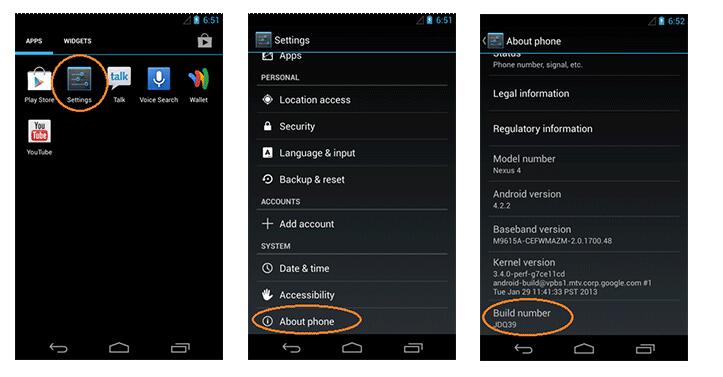
Step 5. Go back to Settings and you will find a new option that says "Developer Options".
Step 6. Check on "USB Debugging" option.
NOTE: If you need to enable USB Debugging on Android 5.0 Lollipop, Android 6.0 or Android 7.0. Just follow this steps in Part 2.
And you are done. You have successfully enabled USB Debugging Mode and you may now use the apps or software that you are trying to run from your PC to your Android device.
Please make sure that enable USB Debugging mode only and only if you need it. Remember to disable the option as soon the work is done to turn off the vulnerability of your phone. If you keep it enabled all the time then it may compromise the risk and security provided by your device for example installing unwanted malware, viruses, adware or downloading any dangerous files from the web.
In order to disable USB Debugging Mode, simply follow the same instruction and toggle off the option.


![]()
![]()
![]()