Like any other tablets, Google Nexus 10 is also a little tablet which can nearly suffer the same system deteriorating problems with misbehaving applications and the wear and tear due to every day usage. The problem sends an impetus when you are prone to installing lot of apps on a daily basis without uninstalling the stacks of applications. Consequently, it may result in erratic behavior; screen freezing intermittently, slow performance, etc. The easiest of all ways is to give away your device to tech shop to deal with the problem, but you cannot rely on them always. Besides, they charge you heavily for even a puny change or rectification. Thus it is better to try out factory reset yourself, which gives the tablet a boost by restoring the system speed, and eliminating the annoying reasons for sudden crashes and irritations.
The article here is all about how to factory reset Nexus 10 . Start reading the methods one by one, which first emphasizes you to backup the contents.
Factory reset or commonly known as master reset will wipe out all contents that your device contains, which may prove to be conditional if your device is new. But if you have been using the tablet for quite a long time, then it surely contains a huge deal of data in the form of music folders, video folders, apps, documents, images, etc. Thus creating a backup of them is safer prior to resetting it.
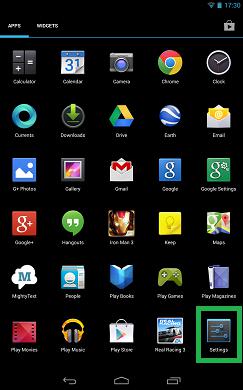
Step 1. First go to the App drawer and then select "Settings".
Step 2. Next go to the Accounts header and press "Add Account". Choose a link or your specific Google account to upload your all data.
Step 3. Now tap on the green icon and then choose the "sync now" button from the top right corner of the screen by your Google Account name.
Step 4. On the following screen that ensues, tick the checkboxes for all those items one by one that you wish to backup on your Google Account. Finally return to the main "Settings" menu list.

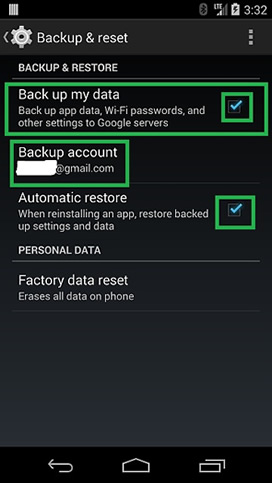
Step 5. Tap on "Backup and Reset" option down in the list and check the checkbox "Backup my data" option from the next screen.
All your chosen data items are backed up to your Google account. And next time you sign to the same account after factory reset, all the synced items will be restored back to your device automatically. Now head on to the main part FACTORY RESET which you can do in two ways.
Don't miss: How to Permanently Delete Photos on Android Phone & Tablet
This is a manual method in which no shortcut button combinations are used. Just you have to head over to the "Settings" app and do the resetting. But remember one thing; you will lose everything your tablet has stored till this date. So prepare backup as mentioned above before doing the factory reset.
Step 1. Go to "Settings" and tap on "Backup and Reset" option under the header "Personal".
Step 2. Scroll down the list, and tap the last option "Factory Data Reset".
Step 3. Next confirm the process by tapping "Reset Tablet" and then "Erase Everything".
Your phone will reboot, but there will be no contents any longer on your tablet. Quickly sign in to your prefer Google account and the device will sync back all that you have created backup of within the account.
In this second way of factory reset, we will not go to any "Settings" menu, but would make use of the hardware buttons to do the factory reset. This approach comes quite handy, thus easier to follow. But once again, don’t forget to backup your tablet like before.
Step 1. First turn off your Nexus 10.
Step 2. Press the "Power" and "Volume Down" buttons together from the side edge of the tablet. Hold them for at least 10 seconds.
Step 3. Quickly an image of Android phone turned upside appears on the screen.
Step 4. Press the "Volume down" key two times and then the "Power" button to select the "Recovery Mode".
Step 5. Next Hold down the Power button and press and release the Volume Up button one more time.
Step 6. With the help of volume keys go to the "Wipe data/ factory reset" option and use the Power Key to choose the option.


![]()
![]()
![]()